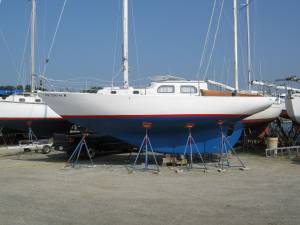
Pearson Triton #59 yawl – SOLD!

February 22, 2012
I have accepted and offer on my Triton and the buyer has given me a deposit. Details to follow.
The Summary

Built in 1959 with substantial renovations over the last 10 years

A beautiful day-sailor with the potential to take you anywhere

  • Atomic 4, fresh water cooled, high-output alternator
  • Recently replaced main mast & boom
    (with used but heftier spars)
  • Main mast standing rigging new, running rigging recent
  • Sails recently reconditioned
  • New custom sail cover
  • Bottom stripped in 2010
  • Deck, cabin, and interior stripped and painted
  • All wiring has been replaced
  • AM/FM/CD player with iPod connection
  • New VHF with DSC
  • Brightwork in very good shape

In sail-away condition!

Tikvah is a masthead yawl built in 1960. I purchased her in 2000, and she then spent the next 5 years in my driveway under renovation. That renovation is documented elsewhere on this blog, and some additional details and pictures are here: http://www.tritonyawl.com.
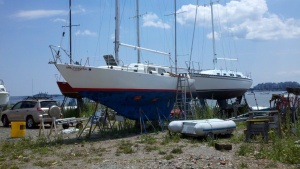
Over the next 5 years I daysailed her while continuing to make improvements. She’s in great shape for daysailing and gets lots of compliments. Tikvah has an Atomic 4 with fresh water cooling that runs great. Sails are in good shape (mizzen is fair, but a kit for a new mizzen is included) and the sails were recently reconditioned by Sailcare. She is currently on the hard in Dorchester, MA.

Some of the details of the renovation:

Exterior
– sanding/grinding and painting the decks, cockpit and cabin with Interlux Interthane LPR (like Perfection)
– applying new non-skid
– removing & reinstalling all deck hardware after drilling & filling
– repairing the deck core as needed
– also sanded/ground interior and painted
– exterior of hull/deck joint was filled in and painted

Ports/hatches
– repaired all bronze opening ports
– replaced lenses in opening and fixed ports
– installed (used) Bowmar(?) forward hatch
– installed aluminum Bowmar hatch in cockpit sole over engine

Wood
– had new mahogany coamings made
– all wood refinished (inside and out)
– replaced hatch boards
– New handrails installed on the outside of the cabin and original handrails moved to the interior

Rigging
– replaced main mast with a used but newer and beefier mast and new SS standing rigging for the main (professionally installed)
– replaced original bronze chainplates with stainless steel
– replaced running rigging (except main sheet)
– mast step replaced
– replaced & painted main boom w/newer (used) and beefier spar
– rigged mainsail as loose-footed
– painted mizzen boom and replaced mizzen running rigging/blocks

Engine/Drive train
– installed fresh water cooling and higher output Balmar alternator with external regulator
– new raw water filter, electric fuel pump, oil pump, carburetor, thermostat, gauges
– installed stainless steel prop shaft, dripless packing, drivesaver and replaced cutlass bearing
– Painted engine Atomic 4 Gold
– Removed & steam cleaned Monel gas tank. Reinstalled with large inspection port and new fuel level sender
– All new engine gauges
– Replaced both batteries with Group 24 AGM
Bottom
– new pintles and gudgeons (for the rudder)
– stripped the bottom paint in 2010, and reapplied two coats of ablative bottom paint
Electrical/Electronics
– Replaced all wiring and installed halogen lighting
– New West Marine VHF with DSC (2011)
– Kenwood stereo w/iPod input
– Rule bilge pump
Miscellaneous
– A new, custom built main sail cover is included.
– Included are parts for a number of incomplete projects including hinged self-draining cockpit covers and a Sailrite kit for a new mizzen
– The buyer will also receive an extra water tank for the v-berth and a small holding tank (neither are installed in the boat)
– There are numerous items available that the buyer will be able to purchase from me at a reduced price, such as a Dickinson diesel/kerosene heater, plow and claw anchors (the boat comes with a Danforth-style anchor and rode), extra bilge pumps, etc.
More Pictures: http://www.flickr.com/photos/37760322@N02/sets/72157624364757399/

Deadlights part 2

September 5, 2011

I meant to write at the beginning of this project log that I have never purchased any quantity of 3M 5200. I am very grateful to the previous owners of my boat that they did not use any such “permanent” adhesives, making it possible for me to take apart just about the entire boat! Of course, if I was joining a deck and a hull, 5200 would seem to be a great product for making sure the hull-deck joint was securely fastened.

So I was a little reluctant to use a product that was advertised as a replacement for mechanical fasteners and was deemed “Very High Bond.” I think this tape has a lot going for it, but I’m a little worried that if I ever need to get this stuff apart, it might not go well. Let’s hope that doesn’t happen!

Once I cleaned up the bronze frames I applied tape to both of the mating surfaces on in the inside and outside frames. Each frame has a surface that mates to the cutout in the cabin wall (I don’t have a headliner FYI) and another surface which mates to the acrylic deadlight lens (or pane, not sure of the exact term?). The tape I bought was 1″ wide, and I only needed it to be around 3/8″ wide. For the long straight sections I could lay out a piece of tape, cut off the excess width, and then apply the excess piece to the other, parallel mating surface. Even then there was a bit left over which I need to trim.

I used a retractable mat knife to cut the tape. As in most cases, a sharp blade works the best. This tape is very stretchy so if you don’t have a sharp blade at the right angle you have to saw through it a bit. But with a little practice you can make nice clean cuts – just like scissors through wrapping paper, if you know what I mean. I put wax paper under the frames while applying the tape so the tape would be less likely to stick when I dropped it.

I thought I might be able to get the tape to follow the curves of the frame, but it was easier to just cut the curves into the tape. I’d press the tape onto the section of frame, and then trim both sides to conform to the curve. With a little planning I cut apply the tape to the outer surface (mates to the cabin wall) and use the excess on the inner surface. I did my best to keep the joints tight between pieces of tape. I was hoping that when I installed the frames and tightened them down the tape would squeeze out of the edges and into the tiny joints as well. It also helps that the tape likes to stick to itself, so the joints are that much more likely to meld together.


Deadlight Repair

August 31, 2011

I’ve been frustrated for years with the deadlights (fixed ports) on my Triton. As anyone with similarly-constructed ports will tell you, they are not easy to install so that they don’t leak. Especially (in my opinion) if you use silicone as recommended.

A recent Good Old Boat article discussed the use of double-sided foam adhesive tape made by 3M. They call the tape VHB for Very High Bond. The author of the article used the tape to install his ports and was pleased with the results. I used nearly the same tape (3M part number 5962) as described in the article, although the tape I was able to find in stock locally (www.btctape.com) was 1″ wide, which worked out fine for me.

First I had to remove the ports and frames. They came off fairly easily. Even though I had tried twice to install the deadlights, I think I may not have used enough sealant both times. I also saw that the silicone did not adhere real well to the acrylic port lenses, but I guess silicone typically does not bond strongly to the acrylic.

Triton Deadlight Frames

Deadlight Lenses


I brought the lenses and frames home and used Digesil from RPM Technologies to chemically remove all traces of the silicone – or so I hoped!

Removing silicone

I used both a brush and a putty knife to apply the Digesil gel. I also used the gel on the sides of the cabin where the deadlights were installed. After letting it sit for a while, I washed the Digesil off and cleaned the frames up using a grinder with a wire wheel.

Clean deadlight frames


Repair Log

August 4, 2011

I had hoped to get down to the boat in the AM, but I ended up doing some work in my basement workshop before going to the boat. I’m happy that I now have use of the bandsaw I acquired some time ago, and I mounted my grinder on the stand I got for it a while back.

Once at the boat (after a stop at WM) I replaced the mizzen outhaul so I don’t now have to take the boom off to bend on the mizzen! I also replaced the mizzen sheet with a slightly smaller one (in diameter).

I used some hardware I got recently to mount a block on the aftmost stanchion for the furler line. I also put a bracket on the bow pulpit to hold the Danforth anchor. Not sure if it will stay there, but it gets it out of the cabin for now and it’s now in a place where it could be deployed easily.

I tried to mount a padeye on the boom to extend the lazy jacks, but the padeye I had did not match the holes I had tapped previously.

Next work day (maybe the earlier part of the day on 8/9 or 8/11) I’ll choose from the following projects:

– Install a padeye to extend the lazy jacks to a 3-branch system

– Attach a bail to the mast and a bracket on the boom for a vang

– Investigate converting the outhaul (main boom) from rope/wire to all rope, and add a block to route the line to the bottom edge of the boom, to allow:

– Install a 4′ section of T-track for reefing blocks

– Loosen stern pulpit, caulk underneath, then:

– Install dorades on after deck

– Install handrails on the coach roof

– Change the engine oil and the fuel and oil filters


Epic Sail

July 12, 2011

Liz S. and I spent about 6 hours on the water today, and sailed all the way around the harbor, passing through Hull Gut. The sun was shining and it was one of those days that it was MUCH nicer on the water than on land. We only had to run the engine a few times, usually as a a precaution (i.e., going under Long Island bridge and through Hull Gut). Because it was predicted to be on the windy side we sailed all day with the jib and mizzen. In the late afternoon it was so light I considered raising the main, but I’m glad we didn’t because it was pretty gusty by the time we were back in Dorchester Bay on the way home.

Liz did a bit of sailing to give me a break, and we took pictures to prove it – which Liz immediately posted to FB. We symbolically waved to her aunt as we passed by Hull.

All in all, a great day and a great sail!


Tikvah Launched!

July 8, 2011

We had to wait an extra day because of problems with the launch rig, but the rain held off today and now Tikvah is floating again! Thanks to Liz S. for coming both today and yesterday to provide help and moral support. Here’s how she looked yesterday, all dressed up but no where to go. She looks pretty good for being over 50 years old, no?

After the boat was launched we helped about 4 others launch their boats. Then it was time to drive it over to the mooring. Instead I decided I was enjoying motoring around so we went out a little ways into the channel. Wouldn’t you know that the engine died?! It’s not done that in quite a while. After briefly panicking I remembered I had a roller furling jib already installed, because we had made good use of yesterday’s delay. So we headed back to the mooring on just the genoa and shortly thereafter the motor started and I ran it for the next 1/2 hour or more with no problems. Go figure.  Hope to go out with Em tomorrow!


Boat and bike stuff for sale

February 20, 2011

I realized recently that I have acquired a bunch of stuff for projects that sounded like a good idea at the time but I now realize I’ll never complete. So, here is my first pass at identifying some of that stuff to offer for sale. At this time I am not offering to ship these items. Pick-up only near Boston, MA.

Boat stuff for sale:

Dickinson Diesel Heater

Bike stuff for sale:

Dahon Mariner 16″ Folding Bike | Parts for a Folding Recumbent ProjectUsed 20″ Rear Wheel w/Deore Cassette hub

Dickinson Newport Diesel Cabin Heater

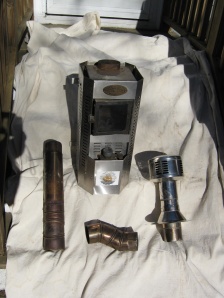
Dickinson Newport Diesel Heater and parts

I bought this heater and associated parts used, and I have never installed or attempted to use this heater. I believe all the parts are there but I can’t know for sure. There are several parts including flue pipe, trim ring and outside cap. In addition to what you see here, I also have a brand new burner assembly that has not yet been installed.

If you were to purchase all this stuff new it would run you over $900 : http://www.dickinsonmarine.com/dheaters.php

Since I am selling it all as-is, I’m asking $495.

Dahon Mariner 16″ Folding Bike

My other passion (besides sailing) is bicycling. I bought this bike to store on the boat. I actually bought two and I plan to keep the other one – unless someone makes me an offer I can’t refuse for the pair. It has 3 speeds and 16″ wheels instead of the current models which have 20″ wheels. I find the bike with the smaller wheels easier to store. There’s a gel pad on the saddle and a cover that goes over the bike for storage. Both have seen better days. I’m a former bike mechanic so this bike will be spiffed up and tuned up for the buyer. Cost for a new one (which is admittedly a very different bike) is around $500. You can pick up this one for $149.

Parts for a Folding Recumbent Project

Not really boat parts, but . . . Some time ago I purchased a bunch of parts from someone who had built a folding recumbent but then parted it out. What you see here is an aluminum frame built up from a Dahon P8,  an Actionbent fiberglass seat , a fork with brake studs which is NOT a Dahon-sized fork (I planned to make some modifications) and a Dahon-sized 20″ front wheel. Asking $249

Used Rear 20″ Wheel – Deore cassette hub

Alex Rims DA16 rim with Snafu Dirtbox tire. 135mm spacing. Removed from a Rans Rocket. Presta valve. Quick release. I never used it – looks to be in very good condition. Minimal. $70


Spinnaker for sale – SOLD!

October 10, 2010

This spinnaker has been sold.

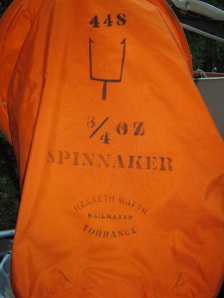
A while back I purchased a traditional spinnaker from the owners of Triton 448. I first thought I might use it as-is (forgetting that I have a shorter rig than a Triton sloop) and then tried to get it re-cut as an asymmetrical, which didn’t work out. So now it’s for sale!

The spinaker is in very good shape. The top and bottom bands are a baby blue, above/below those are sky blue sections, and the middle is yellow. The numbers are in yellow just above the yellow section. On the bottom 12″ or so there is some faint red coloring, probably from the orange spinnaker launch bag that comes with the sail. On the bag it says: 448   3/4 oz. SPINNAKER   KENNETH WATTS SAILMAKER TORRANCE. The luffs of the sail are 34′, and the foot is about 17′ 8″.  The rings at each corner are reinforced with leather. There is a nice bronze swivel at the head.

I went to the Sailrite site and they will charge you over $600 for a spinnaker for a Triton sloop – and then you have to assemble it! So it seemed like $195 would be a good deal. Buyer pays shipping. You can leave a comment on this post if you’re interested.


Future Project?

October 9, 2010

About two years ago I heard that a Triton owner in New Hampshire had decided to break up his Triton (hull number 407) and sell off the parts including his trailer. I purchased a number of items from him including a set of opening ports and a mast. I had the mast installed (with new standing rigging) on my boat last year.

Since he was cutting up the boat, I asked him if he would sell me the cockpit settees with hinged opening hatches. He actually gave them to me for free. So I’m considering installing them at some point down the road since the plastic cockpit settee hatches that came with my boat are not ideal.


Launched!

July 7, 2010

A deadline is a powerful thing. I signed up to get launched on Wednesday, 7 July 2010 and that really helped me focus on getting the boat ready to go. The first coat of bottom paint went on on Thursday, 1 July, and the second went on the next day. After spending a nice 4th of July weekend on the Cape, I was back at the boat on Tuesday painting the first coat of the new boot top stripe (see previous post for some pix and details). At the end of the day Tuesday I realized the boot top stripe needed a second coat, so I came down early on Wednesday to do that before the boat was launched.

The launch took place around 10:00 am, and it went so smoothly that we (Jeremy, Emily and I) were able to get the sails up before we ate lunch. After lunch we went to the mooring and I cleaned the muck and growth off of the mooring pennants. Then we were able to go for a quick sail, basically out to the far end of Thompson Island and back.